In my Bag

They say that what handbag you carry determines your personality style.

Never judge a handbag by its cover, I say. What type of handbag a woman carries may determine what type of personality traits you might have. But I think like most other things, it is the inside that counts.
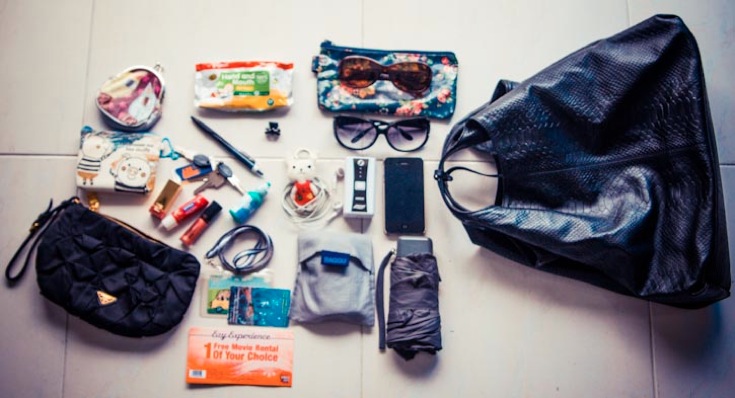
Bag 1

So what’s inside my big slouchy hobo-styled bag? Lots of things :

[wpcol_1third id=”” class=”” style=””]1.Sunglasses – How can I ever leave home without it. Black when I am wearing cool colors, and brown when my outfit is in a warm color[/wpcol_1third] [wpcol_1third id=”” class=”” style=””]2.Iphone and charger – That’s something that will give me withdrawal symptoms if I ever leave home without them[/wpcol_1third] [wpcol_1third_end id=”” class=”” style=””]3.Umbrella – One of the smallest and lightest umbrella that I got a couple a years ago that cost me almost $30. But I am not going to complain about its price, since it is so durable and easy to carry around (It usually inside a Watson plastic bag, which is really handy when the umbrella gets wet)[/wpcol_1third_end]

[wpcol_1third id=”” class=”” style=””]4.Foldable bag – My sis passed me her extra set last year, and I have only used it once since then. Maybe its because I always carry such huge bags that I hardly ever need an extra bag to hold things[/wpcol_1third] [wpcol_1third id=”” class=”” style=””]5.Video Ezy Vouchers – We don’t have regular TV channels at home, so have become die-hard Video Ezy members[/wpcol_1third] [wpcol_1third_end id=”” class=”” style=””]6.EZ link cards – Another thing I can’t leave home without, and K’s card is always in my bag.[/wpcol_1third_end]

[wpcol_1third id=”” class=”” style=””]7.‘White Bunny with a hot pink dress’ earphones holder with iPhone earphones – One of my handmades that I made for a charity sale two years ago[/wpcol_1third] [wpcol_1third id=”” class=”” style=””]8.Black hairclip – I carry different ones in different shades depending on what I am wearing that day. My hair clip need to match my outfit, how can hair clips not match outfits?[/wpcol_1third] [wpcol_1third_end id=”” class=”” style=””]9.Wipes – For wiping K’s dirty mouth and fingers[/wpcol_1third_end]

[wpcol_1third id=”” class=”” style=””]10.Things spilling out of my black pouch – 1 Nivea lip balm, 1 Estee Lauder lip stick with a tiny mirror inside, 1 lip gloss from Mary Kay, Eye Drops for when the contact lenses get really dry, a pen and house keys with a Video Ezy membership keychain attached.[/wpcol_1third] [wpcol_1third id=”” class=”” style=””]11.More stuff spilling out of my black pouch – Hb often grins when he sees me keep my bags within a bag, within a bag. A Piggy card holder with my cards and cash – I don’t like wallets as they are too bulky.[/wpcol_1third] [wpcol_1third_end id=”” class=”” style=””]12.My Cat coin purse – for small change[/wpcol_1third_end]

So what does my bag say about me?

Outwardly I am sort-of, kind-of a fashionista, but inwardly, I embrace my inner-childlike personality.


Linking up with

The Accidental Mom Blogger
Share it:

Related posts:

Photo *Heart* Fridays – How to Capture Sunflares from your Phone

Sunflare1

I have been obsessed with sun-flares since this first sun flare that I managed to capture with my iPhone (photo above). Too often in the mornings, I will be pointing my phone’s camera lens towards the sun trying to position my phone for that perfect shot of the flare, and have since gotten used to weird stares from passer-bys.

Once you are able to capture your first sun flare with your phone, it does get rather addictive. Either that, this is just one of my monologues, to confirm that I am like the only phone camera geek here.

If you are keen to try capturing your own lensflare / sunflare through your phone’s camera, here are some practical tips I have learnt capturing sun-flares from my phone :

1) It has to be a clear day when the sky is blue. The sun will be contrasted against a blue sky.

2) One of the best way to create the sun-burst effect is to have something in front of the sun to block part of the sun rays. It can be trees, buildings, clouds. Or you could easily pick up a leaf to block the sun, only allow some of the sun’s rays to emerge over the edges of the leaf to create lines of light.

3) No mid day sun please! I have found that the afternoon sunlight is too harsh and all you will see in your photo is one big blob of light over the sun. The sun is best before 9.00am or later in the day.

Sunflare2Photo on left taken at close to 6.00 p.m., while the photo on the left was taken at about 8.45 a.m.

4) Hold your phone camera towards the sun, and there will be some eye-squinting involved in this exercise but it helps not to stare directly at the sun. Tilt your phone at various angles so as to achieve that light refraction from the lens. Go on and click even if you can’t see anything, change to different angles and capture the photos. Trial and error can be really helpful here.

5) Once you have captured the sun flare, be careful not to have your photo too bright (i.e. over-exposed).  One easy way I have tried, is to darken the exposure and increase the contrast of the colours. My favorite post processing apps available from the App store are Filterstorm and Snapseed.

Sunflare3

One final tip.

Experiment, experiment, experiment! Don’t give up even though your first few attempts are not successful. I think sun flare has that bit of time and chance involved, and part of the fun of capturing sun flares, is that you never know what photo you are going to get at that moment when you snap the photo.

Who cares even when your photo is not sharp or not perfect, what matters is that you are having fun and capturing these beautiful moments with your phone camera, that you might otherwise forget.

So if you do get into one of those geek-wielding-phone-camera moods, do use these hashtags #happyflare #lensflare #sunflare #sporemombloggers when sharing your happy flare photos on Instagram. Will be looking forward to see your captures!

Sunflare4


Share it:

Related posts:

A SMB Bake Date!

It has been a crazy couple of weeks and I have been craving for cake.

Not the rich decadent sort, but something that could fulfill my cake craving and not have to feel guilty about eating it. I finally got to eat cake (that I made myself!) after spending Saturday morning with Pauline and Louisa of Munch Ministry, and 13 ladies from SMB, where we learnt how to make Hokkaido Chiffon Cakes.

Munchministry5

Part of the process in making a chiffon cake is beat the egg whites into a meringue. Unlike the traditional Pandan Chiffon Cakes that my mom used to bake often when I was a child, there isn’t a need for the egg whites to be beaten into stiff peaks for Hokkaido Chiffon Cakes. It isn’t that difficult to make the chiffon cake, however you will need to take note some of the small details in the process to achieve the light and airy texture of the cake.

The separation of the egg white from the egg yolk has to be done quite gingerly, to ensure that no egg yolk will find its way into the bowl of whites which will affect the fullness of the meringue.

Munchministry2

As you can see, the activity of separating egg yolks from the whites, can be easy for some like Estella. While for others, like Jennifer, some of the egg yolk did manage to find their way into her bowl of egg whites and she had to try to remove the runny yolks from the mixing bowl. As for my own experience separating yolks from the white? I wasted one egg after being too heavy handed, breaking the yolk when hitting the egg swiftly against the edge of a bowl.

Still need some help in learning how to separate the egg yolk from the egg white? Here’s 6 different ways how to separate egg yolk from the whites.

When it came to beating the egg whites, cream of tartar was added to stabilize the egg whites. Do make sure that the mixer and mixing bowls are clean and dry, Any specks of oil, water or yolk can affect the volume of the meringue. Here are more useful tips I learnt to ensure that the meringue stiffens;

1. Wait for the egg white mixture to turn bubbly and foamy during mixing before adding the sugar. The sugar needs to be added gradually in 3 parts, instead of all at once

2. Cold eggs separate more easily, so do leave the eggs out at room temperature before beating, for maximum volume in the meringue

3. Use copper, glass or stainless steel mixing bowl, and not plastic as it might keep some grease stains which will affect the meringue

4. A small amount of cream of tartar stabilizes the ‘foam’ and makes it less likely to collapse

Munchministry6 Munchministry3

Digress. I think mom bloggers are experts when it comes to knowing when to stop what they are doing / pass the job to someone else, flash their pearlies and strike that perfect pose for 5 seconds, when a roving camera comes along for a photo opportunity.

Munchministry1 Munchministry7

Now back to baking.

Mabel (my baking partner) and I shared the duties, she worked on the egg yolk mixture, while I focused on getting the meringue ready. We were concerned initially that the meringue mix was done too early and that it might curdle and collapse before folding in the egg yolk mixture. However, Pauline mentioned that the recipe will work fine even when the meringue is kept aside for a while before being added in (Phew!). Would have been a different story though, if it was Pandan Chiffon that we were attempting to make.

We gently folded in the egg yolk + vegetable oil batter into the egg white meringue and took note not to stir or beat the batter in, so as to ensure a light and fluffy chiffon cupcake. Then it was time to pour the mixture into cupcakes holders and pop in to the oven for about 15-25 minutes.

Munchministry8

The cupcakes were removed from the oven when it was lightly browned, and Mabel and I waited for the cupcakes to cool before piping in the custard filling.

Munchministry9

We were likely the most efficient team that morning, who got our cupcakes rather quickly into the oven then piped in custard fillings and we couldn’t resist picking up one each for ourselves to try. Probably on a good day with cake cravings, I could devour 5 of these at one sitting.

Munchministry10

Ta-daa! Team Efficient with our Hokkaido Chiffon Cakes!

Munchministry 20

Munchministry 22Front (L to R) Mabel, Ai, Cherie, Estella, Louisa, Pauline, Nicole and Jiahui, Me, Regina and Caden. Adeline, Klessis, Connie, Liza, Jennifer, PC and Delphine.

Thanks to Pauline and Louisa for hosting this scrumptious bake date to add to the celebrations for our 1st birthday for SMB. Do check out Munch Ministry website for the recipe for Hokkaido Chiffon Cupcakes.

Do also read Mabel’s post on our baking session with plenty of candid photos.

What’s next for SMB is One? Stay tuned, details to be shared soon!

SingaporeMomBloggers

Share it:

Related posts: