Like Life, Art doesn’t need to be perfect.

Life seems to have shifted gears, and I am back into a slow moving, but contemplative period in my life.

Well I am generally contemplative most of the time :) but this slow pace have put me in this mood to jot down my thoughts on paper, and use these thoughts and feelings constructively by trying to create something with them.

That’s how I started doodling in my sketchbooks.

DrawandPaint 1

That’s the boy’s sketchbook, not mine. My sketchbooks have black boring looking covers.

I bought some sketchbooks more than a year ago, when I took some watercolour painting classes. Where I spent most of my time during class painting different types of fruit. The technique which I was taught, but never got the hang of, was realism, i.e., draw and paint realistic looking fruits.

Oh boy, fruit is just about the toughest things I have ever tried painting.

That experience likely created the inertia of not picking up the brush for the next 10 months, until 2 weeks ago. I was motivated by a comment that the boy said to me, “Mom, I haven’t seen you use these brushes for a very long time,” which got me thinking why I am not painting at all.

It was due to the technical difficulty of painting these fruits that got me fearful, fearful of painting hideous-looking fruits or things.

Growing up, I had this disease of perfectionism that when I start on something, I have to be good at it. If not, I just have the attitude that any endeavour will be a total waste of time, and I shouldn’t have started doing it in the first place.

This has to be a result of growing up in a society that grades people on performance that has created this subtle fear in me, that if I can’t make it look good, achieve a certain level of success, or close to perfection, I should not even waste my time trying.

Most of us have been taught, either directly or indirectly, that what we create or do, does not bring us any returns, either through financial or recognition, that it is a useless thing to pursue with our time.

It was only when it finally dawned on me that I don’t have to create anything perfect or anything close to beautiful, or even consider developing a career out of it. And my focus on this endeavour should be to enjoy the process of doodling my thoughts through pictures and words on paper.

DrawandPaint 7

I am enjoying the process of drawing and painting that I started illustrating bible verses. Verses or specific topics that I am led to read and study, which I can continue meditating the meaning as I illustrate the pictures for the verse.

DrawandPaint 8

DrawandPaint 10

DrawandPaint 9

Blots, wonky looking drawings, crooked lines and all. I just need to embrace the imperfections in Art!

DrawandPaint 6

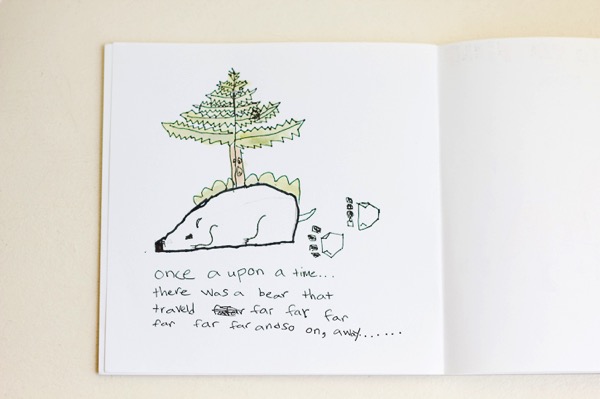
I am inculcating the same attitude in the little boy and I love these drawings he did of some animals.

When he saw me drawing on the the sketchbook, he said that he wanted to do the same. When he first started on his own sketchbook, he asked for my help to draw the outlines of the animals that he was attempting to draw.

I refused to help him and told him that if I draw the outlines for him, it will not be considered his work anymore. I told him that it really doesn’t matter that the artwork isn’t perfect, what matters is that he created it himself.

These animals are in odd shapes, but they have so much character with their little imperfections.

DrawandPaint 3

DrawandPaint 2

DrawandPaint 11

There is this saying ‘Practice makes Perfect.’ I have to toss out this saying, as I don’t intend to be perfect with drawing and painting. However, ‘Practice’ will be the key foundation to experiment with new ideas, learn from the mistakes, and to hone the skills that I intend to develop.

One of the best advice that I have read before is that, ‘It is not the quest to achieve one perfect goal or piece of work that matters, it’s the skills that you develop from doing a volume of work. Focus on the repetitions that lead to the place.’

So I have started with drawing and painting in my Sketchbook at least 3x a week.

So do excuse the visual mess, as I continue to flood my IG account with my wonky looking pictures.

Brave quote90

illustration by Lisa Congdon 

Here for more posts on this blog on Art and Learning Art
Share it:

Related posts:

Decorating a Plain Paper Bag with Kirigami Rabbits

Kirigami giftwrap 16

This paper bag is as plain as it gets, no frills at all, and it costs only $2 for 3 from Daiso.

So what do you do with plain paper bags? Use Washi!

One word of caution in using Washi Tape, please don’t paste many different patterns together, like there is no end to the tape. Personally I think it’s nice to use 3-4 different designs, as long as the colours are complementary to one another.

When pasting Washi on stuff, think patterns, think lines, and shapes. Nice decorated MT tapes are wasted when they are pasted on stuff haphazardly. You might have a huge stash, but do try to restrain yourself when it comes to decorating stuff with Washi, as it might just end up looking like your 3 year old kid did the crafting.

What you will need for this project :

1. 1 Kraft Paper Bag

2. Wooden Clothes-peg

3. Washi Tape

4. Penknife

5. Scissors

Kirigami giftwrap 25

  • Paste Washi Tape on Kraft Paper Bag. I kept it simple, as will be adding on a Kirigami feature on the right of the bag to balance it out visually.

Kirigami giftwrap 26

  • More use for the Washi Tape! Paste tape on the wooden clothes peg, trim away the excess
  • Making the Kirigami Rabbits
Kirigami giftwrap 17

You will need :

1. Origami Paper – In a matching shade to the Washi Tape

2. Sharp Scissors

3. Pen-knife

4. Xacto Knife

5. Self-Healing Mat

6. Kirigami Bear (4-fold) and Rabbit (8-fold) patterns Rabbitkirigami numbered

1) Fold the 15cm x 15cm Origami Paper in Half

2) Fold it into quarters

3) Fold it into 1/8 – this is known as the Kirigami Rectangle 8-Fold

4) Make sure that the triple V’s of the folds are facing to the left side

  • Cutting out the Kirigami Rabbits

Rabbitkirigami1 numbered

1) Staple the pattern of the rabbit on the base of the Rectangle 8-Fold paper, making sure that the edges are lined up

2) Cut out the pattern, you will have to use the Xacto Knife for the fine corners of the pattern.

3) Open up the paper, you should see 3 pairs of rabbits holding hearts, and 2 rabbits holding on to halve heart shapes.

  • On plain drawing paper, draw a circle using a drawing compass.

Kirigami giftwrap 27

  • Paste the Kirigami Rabbit cut-out on the circled card, trim off the excess paper cut-out

Kirigami giftwrap 28

  • Clip the card on to the right side of the bag, with the wooden clothes-peg.
There you have it, a decorated Kraft Paper Bag with Washi and Kirigami Rabbits card. This design is versatile for a gift bag for a 1-month old baby present, or can be used to hold a gift for a lady.

Kirigami giftwrap 15

P.S. In case you are wondering if I am using Rabbits, as it is Easter this weekend. For sure,  you can use the Kirigami Rabbits design for your Easter bags. I used this bag to hold a gift for a friend, didn’t need any specific occasion.

This post was not planned to coincide with Easter this week, you can read what I think about ‘Rabbits and Eggs’ that are commonly used as celebrated visuals for Easter.

Share it:

Related posts:

Bow Origami and Bear Kirigami for Gift Wrapping

After the last experience I had with gift-wrapping during Christmas last year, I have since given up on patterned papers for gift wrapping.

I didn’t do such a bad job with it, but I felt the prints were kind of busy and it was not that worth spending money on since gift wrap paper was not exactly that cheap from Typo. The prints were lovely and festive, but they were ‘time-sensitive’, as I am not able to use the remaining Christmas gift-wrap paper until Christmas comes around this year.

Screen Shot 2015 03 11 at 3 22 34 pm

I like to work with cheap and easily accessible materials for crafting. And the best place for cheap but useful materials to be used in crafting? It’s Daiso, of course (this is not a sponsored post btw, just sharing my fondness for cheap craft materials from Daiso).

The thing with Daiso I realised, is that you need to have a rough idea of what you plan to craft and be very specific with the kind of materials that can be used for your project, if not, you will end up cluttering your home with lots of cheap but don’t-know-what-to-do-with-them materials.

As I am into Origami and Kirigami lately, I have been buying Origami Paper. And from my last trip to Daiso, I couldn’t resist getting 2 of the $2 Washi Tapes that were sold there.

Since we are into the topic of Washi Tape, let me show off my collection.

Screen Shot 2015 03 11 at 3 38 27 pm

Yup. It’s just 10 rolls of multicoloured washi and the two new rolls that I got from Daiso. You were expecting a whole stash, isn’t it? Well, I did say that I was a cheap crafter, I only buy what I know I will use. I have been using the multi-coloured tapes so much for my #InHisLoveMail snail mail packages, that I might have to get a replacement set quite soon.

I think Washi is one of the most ‘dangerous’ craft materials that are out there, especially the MT branded ones. It is easy to become a MT Washi Collector, but a little more challenging to be a frequent Washi user and knowing how to use them tastefully for crafting projects. Enough from me, griping about the dangers of Washi…

So without further ado, here’s sharing a gift wrapping idea combining Origami, Kirigami, Kraft Paper and Washi Tape.

Kirigami giftwrap 14

What you will need;

1. Origami Paper (3 sheets, colour of your choice)

2. Kraft Paper

3. Washi Tape

4. Scissors

5. Sticky Tape

6. Kirigami Bear Pattern (available together with the pattern in the next post)

*You don’t need a self-healing mat for this, as the Kirigami Bear Pattern can be easily cut out using a sharp pair of scissors


  • Making the Origami Bow

Origamibowwithnumber

1) Select to compliment colours for the ribbon, I chose grey and pink
2) Have the white sides of the origami paper facing one another
3) Glue the back of the origami sheets together
4) You will then get a single sheet of origami, front is coloured grey, and the back is pink.


The instructions to make the origami bow is found in a YouTube video here:

Kirigamibow1

5) I used a gold pen to draw dots on the origami bow to make it a gold polka-dotted bow, you can keep it plain if you prefer.


  • Making the Kirigami Bear

Kirigamibearnumbered

1) Fold the 15cm x 15cm Origami paper in half

2) Fold it into quarters – this is known as the Kirigami Rectangle 4-Fold

3) Make sure that the double v’s of the folds are facing the left side

4) Staple the bear pattern at the barn of the 4-fold rectangle, making sure that the edges are lined up with one other.

5) Cut out the pattern, and unfold the paper. You should see 2 pairs of bears joined together.

Kirigami giftwrap 5

  • Wrap the box or present with Kraft Paper
  • Paste the Washi Tape vertically across, indented to the left of the box
  • Intersect the Washi Tape horizontally across, indented to the 3/4 top part of the box

Kirigami giftwrap 12

  • Paste the Origami Bow on the intersection where the Washi Tape crosses one another
  • And paste the Kirigami Bear diagonally below


And there you have it, a gift wrapping design with a Bow Origami and Bear Kirigami! This gift wrapping design can be for a guy (my dad’s birthday is coming up in April) as you can skip the drawing the polka dots on bow, and the bears make it less feminine. But it is adaptable for a gift for a child or a lady too.

Kirigami giftwrap 13

**Note : The Kirigami Bear pattern will be available together with the pattern for the next post

Share it:

Related posts: